What Does Spring RIB Prep Involve?
What does spring RIB prep involve? It is the seasonal process of inspecting, cleaning, and protecting a rigid inflatable boat's fabric tubes, fiberglass hull, and onboard surfaces after winter storage. Spring RIB maintenance covers pressure testing, seam and valve inspection, material-specific tube cleaning, UV protectant application, and hull care. Done right, this work extends tube life by years and catches small problems before they strand you at the fuel dock. I've been running charter RIBs and detailing boats in salt water for fifteen years now. Every spring, I see the same tube failures that could have been prevented with a Saturday morning and the right products. This guide walks through my complete process.
For a broader seasonal checklist covering all boat types, see our spring boat prep checklist for 2026.
Why Do Inflatable Tubes Need Different Care Than Hard Hulls?
A fiberglass hull is a rigid, non-porous surface. You can hit it with compounds, polishes, and aggressive cleaners without much worry. Inflatable tubes are a different animal. They're made from flexible fabrics coated with either Hypalon (CSM) or PVC, and both materials respond poorly to the chemicals that keep gelcoat looking sharp.
Hypalon is a synthetic rubber, a chlorosulfonated polyethylene that resists UV, chemicals, and temperature extremes. It's the premium choice. You'll find it on military RIBs, high-end tenders, and commercial workboats. It costs more, lasts longer, and tolerates a wider range of cleaners. But it still degrades. Hypalon oxidizes over time, turning from a smooth dark gray to a chalky, faded surface. Left unchecked, that oxidation leads to porosity, and porous tubes lose air.
PVC tubes use a polyester fabric base coated with polyvinyl chloride. They're lighter on the wallet, and modern PVC formulations have improved dramatically. But PVC relies on plasticizers to stay flexible. Strip those plasticizers with the wrong cleaner, and you get stiff, cracking fabric that looks ten years older than it is.
Here's what catches people off guard: UV degradation hits inflatable tubes faster than gelcoat. A fiberglass hull has a thick, pigmented barrier designed to absorb UV energy. Tube fabric is thinner, and its protective properties depend on surface coatings that wear off with use and weather. According to the International Institute of Marine Surveying, UV radiation is the single largest contributor to inflatable tube degradation, outpacing abrasion and chemical exposure in most recreational applications.
UV radiation degrades inflatable boat tubes faster than it affects fiberglass gelcoat because tube fabrics rely on thin surface coatings for protection rather than the thick, pigmented barriers found in hull layups. Hypalon (CSM) resists UV through its chlorosulfonated polyethylene chemistry but still oxidizes over seasons of sun exposure, leading to surface chalking and eventual porosity. PVC tubes depend on plasticizers for flexibility, and UV energy accelerates plasticizer migration to the surface, where it washes away. This process leaves PVC stiff and prone to cracking. Regular UV protectant application after cleaning restores a sacrificial barrier on both materials, slowing molecular breakdown and extending tube service life by three to five years in typical recreational use conditions.
Hypalon vs PVC: How Do Care Requirements Differ?
| Factor | Hypalon (CSM) | PVC |
|---|---|---|
| UV Resistance | High; degrades slowly through oxidation | Moderate; plasticizer loss accelerates with UV |
| Chemical Tolerance | Broad; handles most marine solvents | Narrow; solvents strip plasticizers |
| Cleaning Agents | Dedicated Hypalon cleaner or mild solvent-based | PVC-specific cleaner only; no solvents |
| Stain Removal | MEK or acetone for tough stains (with care) | Never use acetone or MEK; use PVC stain remover |
| UV Protectant Type | Rubber-compatible UV blocker | Plasticizer-restoring UV protectant |
| Repair Adhesive | Two-part Hypalon glue (Clifton, Bostik) | PVC-specific single or two-part adhesive |
| Lifespan (maintained) | 15-20+ years | 7-10 years |
| Lifespan (neglected) | 8-10 years | 4-6 years |
| Cost | Higher (often 40-60% more) | Lower |
| Texture When New | Matte, rubbery | Smoother, slight gloss |
That lifespan gap between "maintained" and "neglected" should make the case for spring prep on its own.
What Should You Inspect After Winter Storage?
Before you touch a cleaner or a bottle of protectant, you need to know what you're working with. Winter does things to tubes. Temperature swings stress seams. Rodents chew valves. Moisture trapped under covers breeds mildew that bonds with the fabric surface.
Here's my post-winter inspection checklist. I run through this on every charter RIB before the season opens.
Pressure Test
Inflate all chambers to the manufacturer's recommended PSI. Use a low-pressure gauge rated for inflatables, not the tire gauge from your truck. Mark the pressure and time. Walk away for 24 hours. A drop of more than 10% indicates a leak. If it holds, you're clear. If it drops, isolate each chamber and find the source before you go further.
Seam Inspection
Run your fingers along every glued seam. Feel for lifting edges, bubbling, or areas where the overlap has separated. Pay special attention to the bow seam, where the tube curves tightest, and the transom attachment points, where vibration stress concentrates. Spray soapy water on suspect areas while the tube is pressurized. Bubbles don't lie.
Valve Condition
Remove each valve cap and inspect the housing. Push the valve core and listen for smooth airflow. Grit, salt crystals, and corrosion can prevent a clean seal. I keep a valve wrench and spare cores in my kit because a $3 valve core failure will ruin your afternoon faster than anything else on the boat.
Rodent and Pest Damage
Don't skip this. Rodent damage is one of the most common and costly problems found during spring RIB inspections. Mice and other rodents chew through tube fabric, valve housings, and seam adhesive during winter storage, and their acidic urine degrades both Hypalon and PVC over time. Check around valve bases, transom attachment points, and any area where tubes contact the hull for gnaw marks, droppings, or nesting material. If you find evidence of rodent activity, inspect every inch of tube fabric under good lighting before inflating to full pressure. A tube that looks intact may have weakened fabric that fails under load.
Discoloration and Surface Condition
Look for yellowing on PVC (plasticizer migration), gray chalking on Hypalon (oxidation), black mold spots, green algae staining, and rust marks from metal contact. Note these areas. Some will clean off. Others tell you the fabric is compromised and needs closer attention or professional assessment.
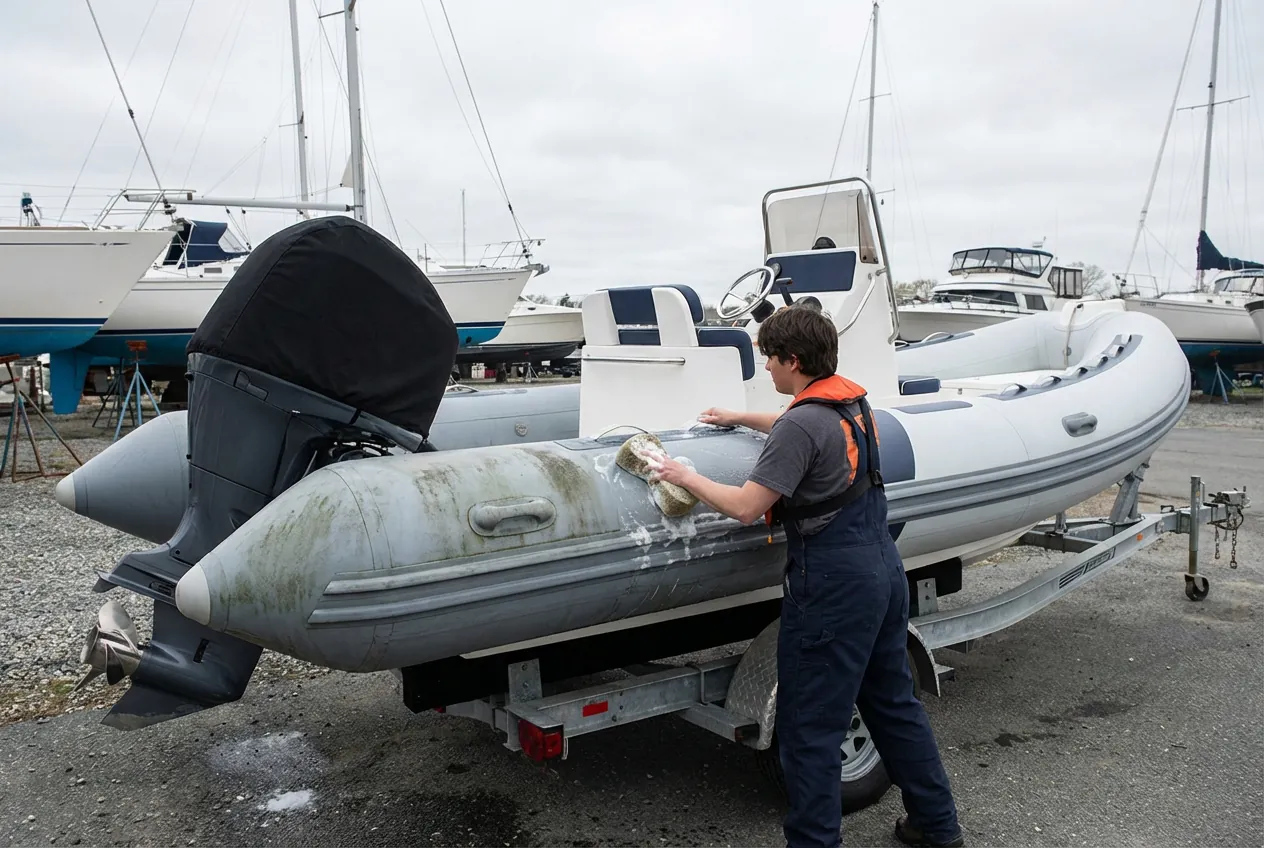
How Do You Clean Inflatable Tubes Properly?
This is where good intentions cause the most damage. I've watched people scrub RIB tubes with hull cleaner, dish soap, and once, memorably, oven cleaner. Every one of those boats needed new tubes within two years.
Regular boat wash, even the marine-specific kind, is formulated for gelcoat. The pH levels and solvent loads are wrong for tube fabric. They strip the very coatings and plasticizers that keep your tubes healthy. It's like washing a leather jacket with laundry bleach.
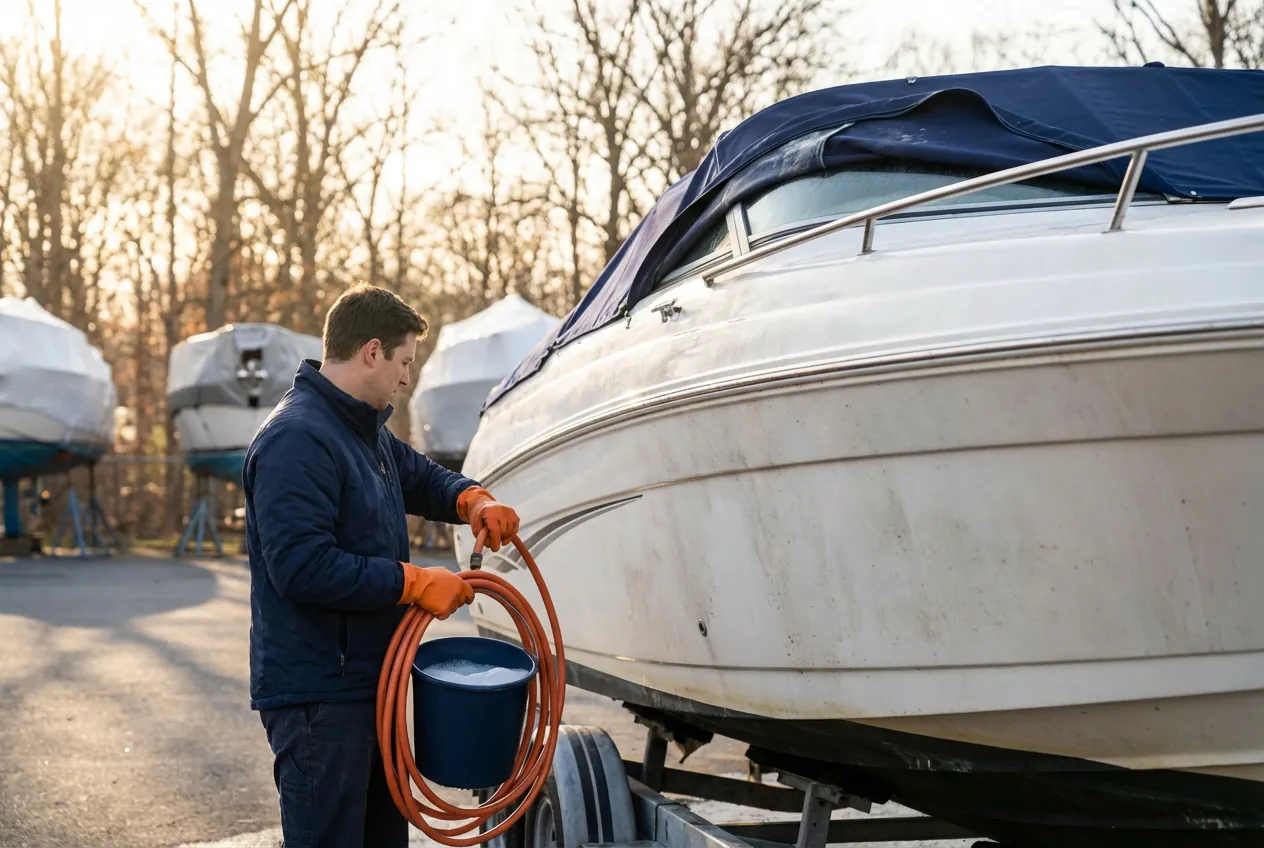
Step 1: Rinse
Start with a freshwater rinse. A garden hose with moderate pressure works. You want to remove loose salt, sand, and debris before any chemical touches the surface. Pay attention to seam crevices and valve recesses where grit hides.
Step 2: Apply Tube-Specific Cleaner
This is where Liquid RIB earns its place in my kit. It's formulated for both Hypalon and PVC tube fabrics. I've run it on everything from a 7-meter Zodiac ProOpen to a 3-meter Highfield tender, and it handles the job without the material damage you get from generic cleaners.
Spray Liquid RIB onto a section of tube about two feet wide. Don't try to do the whole boat at once. Work in manageable panels so the cleaner doesn't dry on the surface.
Step 3: Agitate
Use a medium-bristle brush. Not a stiff deck brush, which will abrade the fabric, and not a soft detailing brush, which won't move embedded grime. A medium nylon-bristle brush with a short handle gives you the right pressure and control. Work in straight, overlapping strokes along the length of the tube. Circular scrubbing concentrates force on one spot and can wear through surface coatings.
Step 4: Tackle Stubborn Stains
For Hypalon: oxidation staining responds well to a slightly more concentrated application of Liquid RIB with extra dwell time. For the worst cases, a small amount of MEK (methyl ethyl ketone) on a rag will cut through stubborn marks. Use MEK sparingly. It removes material. Think of it as wet sanding, not washing.
For PVC: forget MEK and acetone. Both will dissolve the surface. Liquid RIB handles most PVC stains with a second application and gentle agitation. Rust stains on PVC may need an oxalic acid-based cleaner rated for PVC fabric. Test in a hidden area first.
Cleaning inflatable boat tubes requires fabric-specific products because standard marine boat wash contains alkaline compounds and solvents designed for fiberglass gelcoat. These chemicals strip plasticizers from PVC tube fabric, causing premature stiffening and cracking. On Hypalon tubes, harsh detergents accelerate surface oxidation and degrade the chlorosulfonated polyethylene coating. Proper tube cleaning uses a pH-neutral or mildly acidic cleaner formulated for flexible marine fabrics, applied in sections with a medium-bristle nylon brush using straight overlapping strokes. Stubborn oxidation on Hypalon may tolerate careful MEK spot treatment, while PVC stains should never contact acetone or ketone solvents. Rinsing each section thoroughly before the cleaner dries prevents chemical residue from continuing to act on the fabric surface between washes.
Step 5: Rinse Each Section
Rinse the section you just cleaned before moving to the next. Don't let product sit and dry. Dried cleaner residue continues to work on the fabric and can leave haze marks that are difficult to remove later. Use enough water to see clear runoff.
Step 6: Dry
Let the tubes air-dry, or use clean microfiber towels to speed things up. Don't apply UV protectant to wet tubes. The product needs to bond with the dry fabric surface to form a proper barrier.
Why Does UV Protection Matter More for Inflatables?
I mentioned this above, but it's worth its own section because UV damage is the number one killer of inflatable tubes. Ahead of punctures. Ahead of abrasion. Ahead of improper storage.
According to marine industry estimates, tube replacement on mid-size RIBs typically costs several thousand dollars or more depending on the material, manufacturer, and labor, with Hypalon tubes generally running higher than PVC. That's a painful invoice for damage that a $40 bottle of protectant and thirty minutes of work per month could have prevented.
How Do You Apply UV Protectant to Tubes?
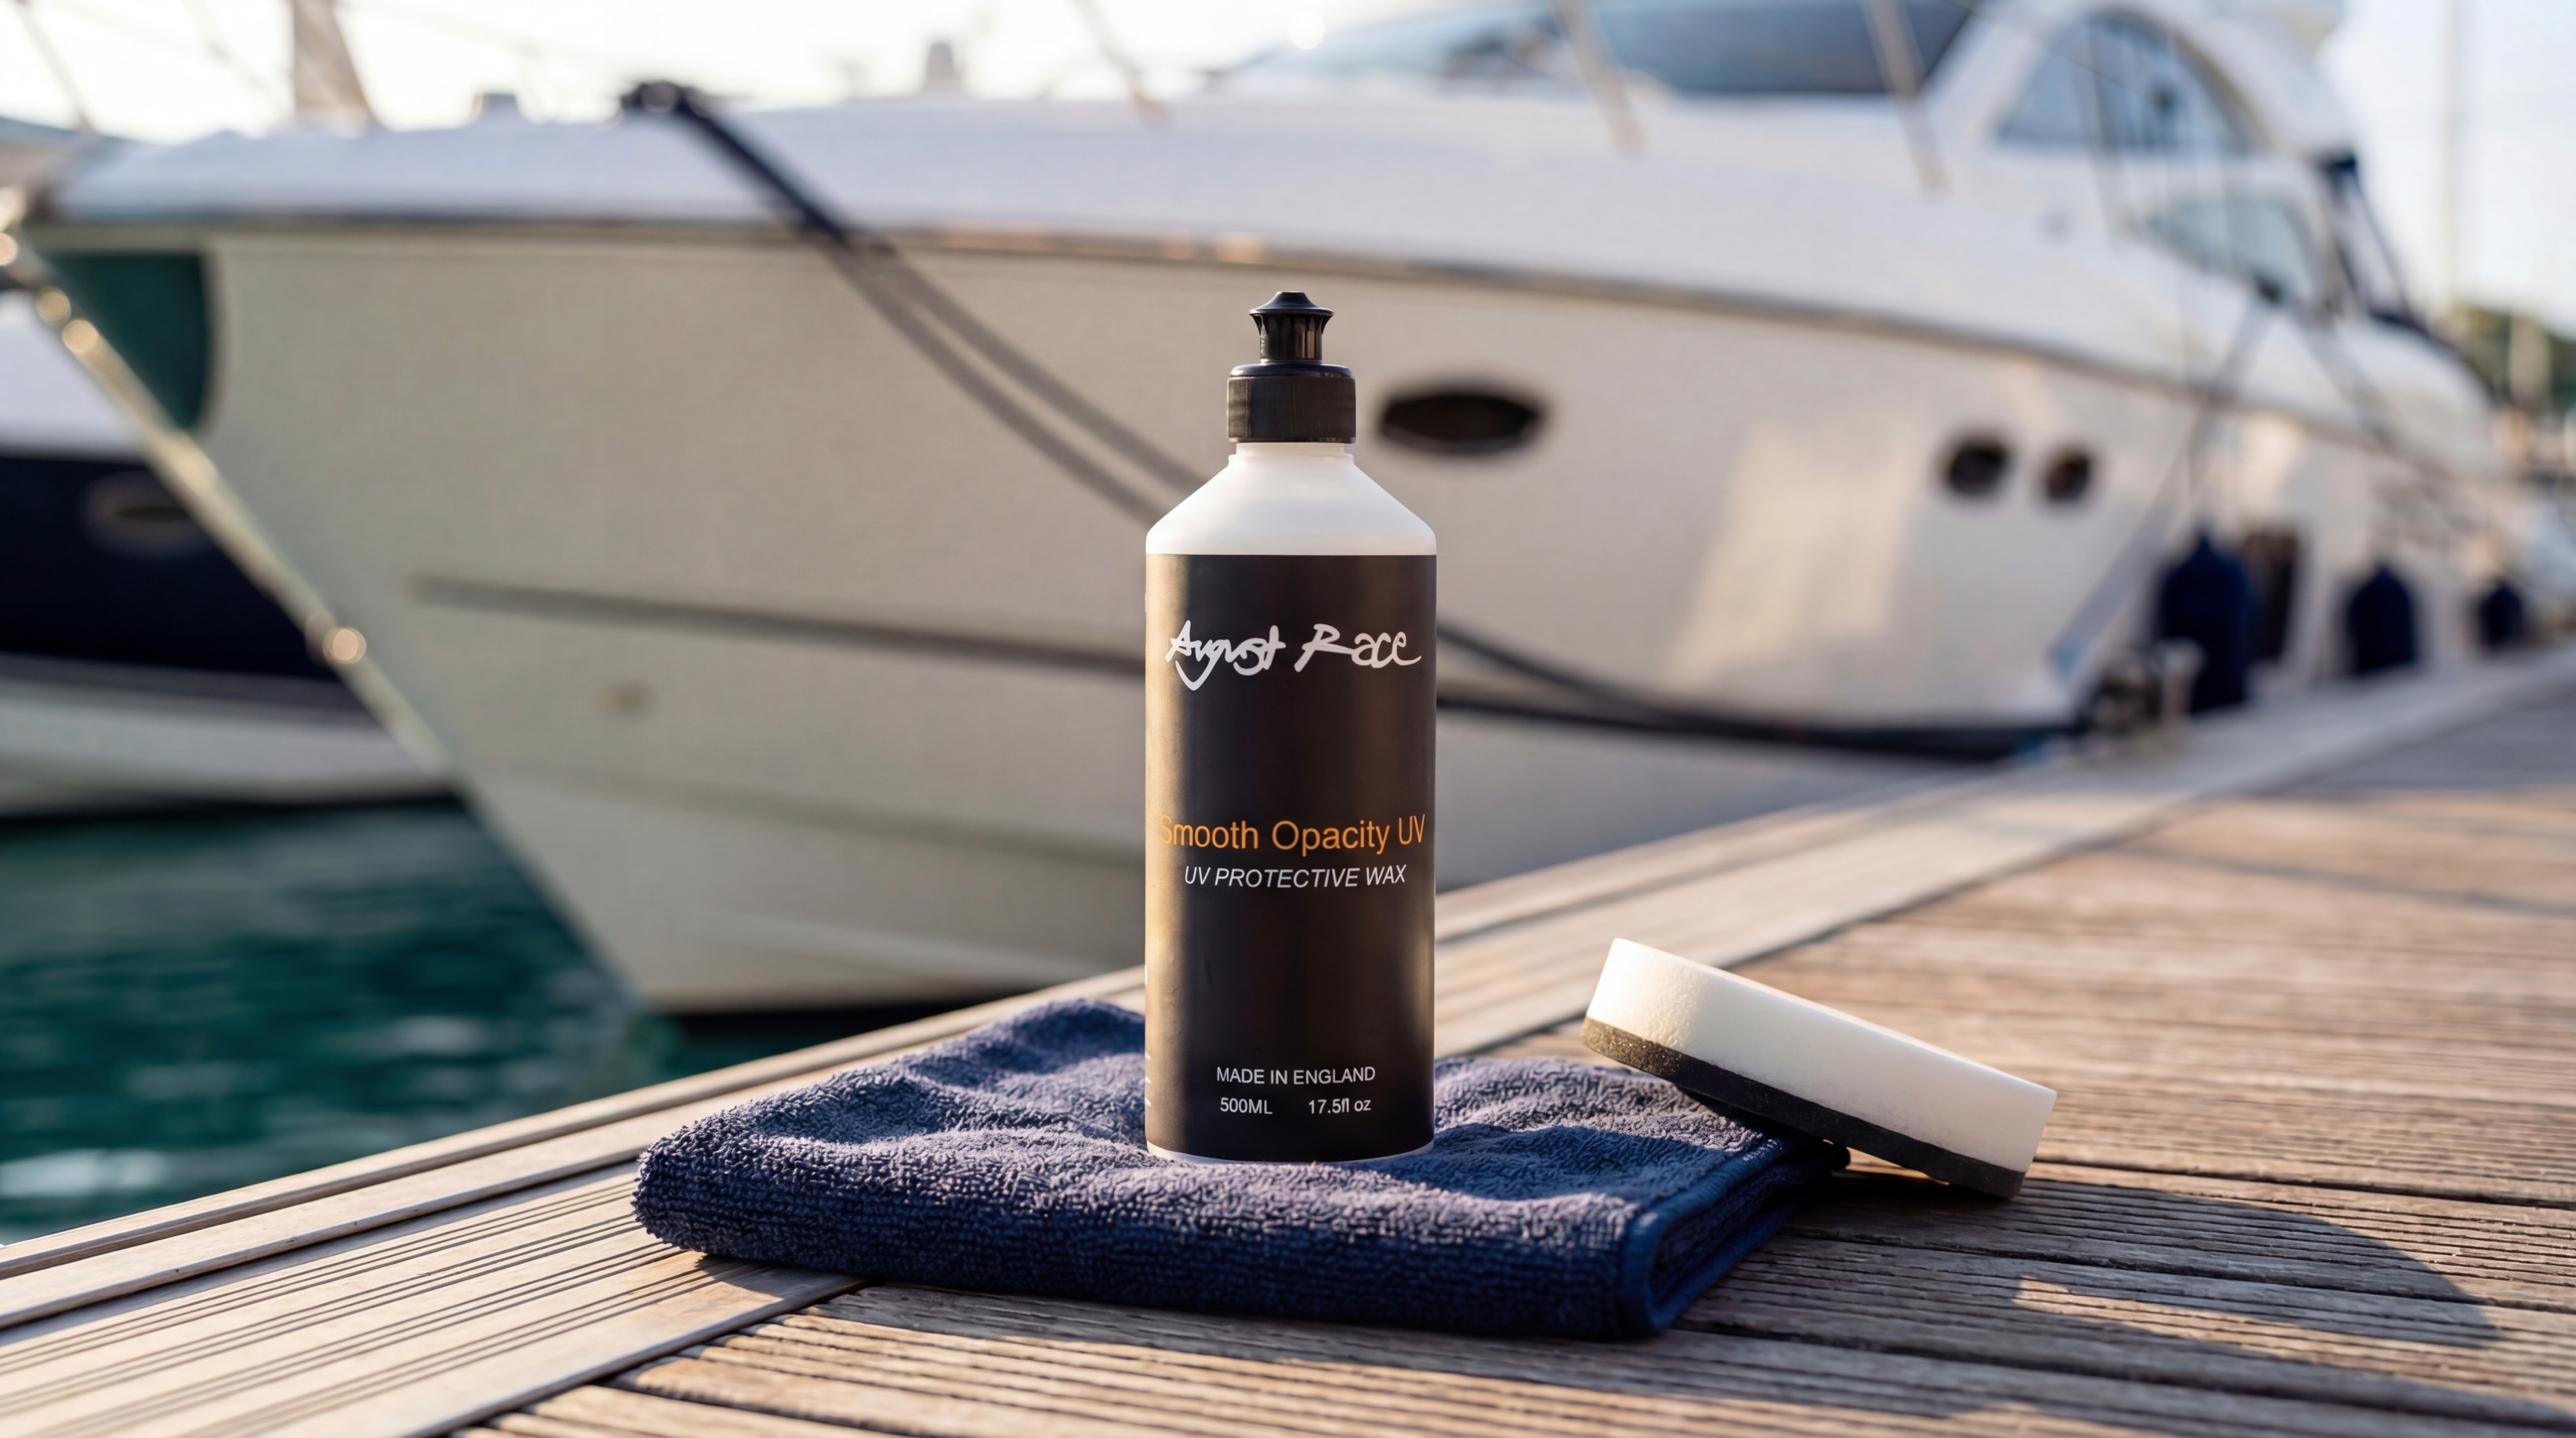
Once your tubes are clean and dry, apply LR Sealer UV. This product was built for this job. It deposits a UV-blocking layer that bonds with both Hypalon and PVC surfaces, and it restores plasticizer balance in PVC tubes.
Application technique:
- Shake the bottle well. The UV-blocking agents settle.
- Apply to a foam applicator pad or clean microfiber cloth. Don't spray directly onto the tube unless the product instructions say otherwise. You want even coverage, not pooling in seam crevices.
- Work in long, overlapping strokes along the tube's length. Same direction as your cleaning strokes.
- Apply a thin, even coat. More product does not mean more protection. A thick layer will attract dirt and create a sticky surface.
- Allow 20-30 minutes of cure time before the boat goes back in the water or under a cover.
How Often Should You Reapply?
For boats in regular use, every four to six weeks through the season. If you're running a charter operation in South Florida or the Caribbean, every three weeks. Saltwater spray, dock rub, and passenger traffic wear the protective layer faster than you'd think.
Always reapply after a deep cleaning session, since the cleaning process removes some of the existing protectant. For a complete breakdown of UV protection across all marine surfaces, see our UV protection marine guide.
UV protectant application on inflatable tubes follows a specific technique for maximum durability. The product should be applied to a foam pad or clean microfiber cloth rather than sprayed directly onto the tube surface, ensuring even distribution without pooling in seams or valve recesses. Long overlapping strokes along the tube length create consistent coverage. A single thin coat outperforms a thick application because excess product attracts dirt particles and creates a tacky surface that accelerates soiling. Cure time of twenty to thirty minutes before water contact or cover installation allows the UV-blocking agents to bond with the fabric. Reapplication every four to six weeks maintains protection through the boating season, with more frequent treatment needed for boats in tropical climates or commercial service where salt spray and abrasion erode the barrier faster.
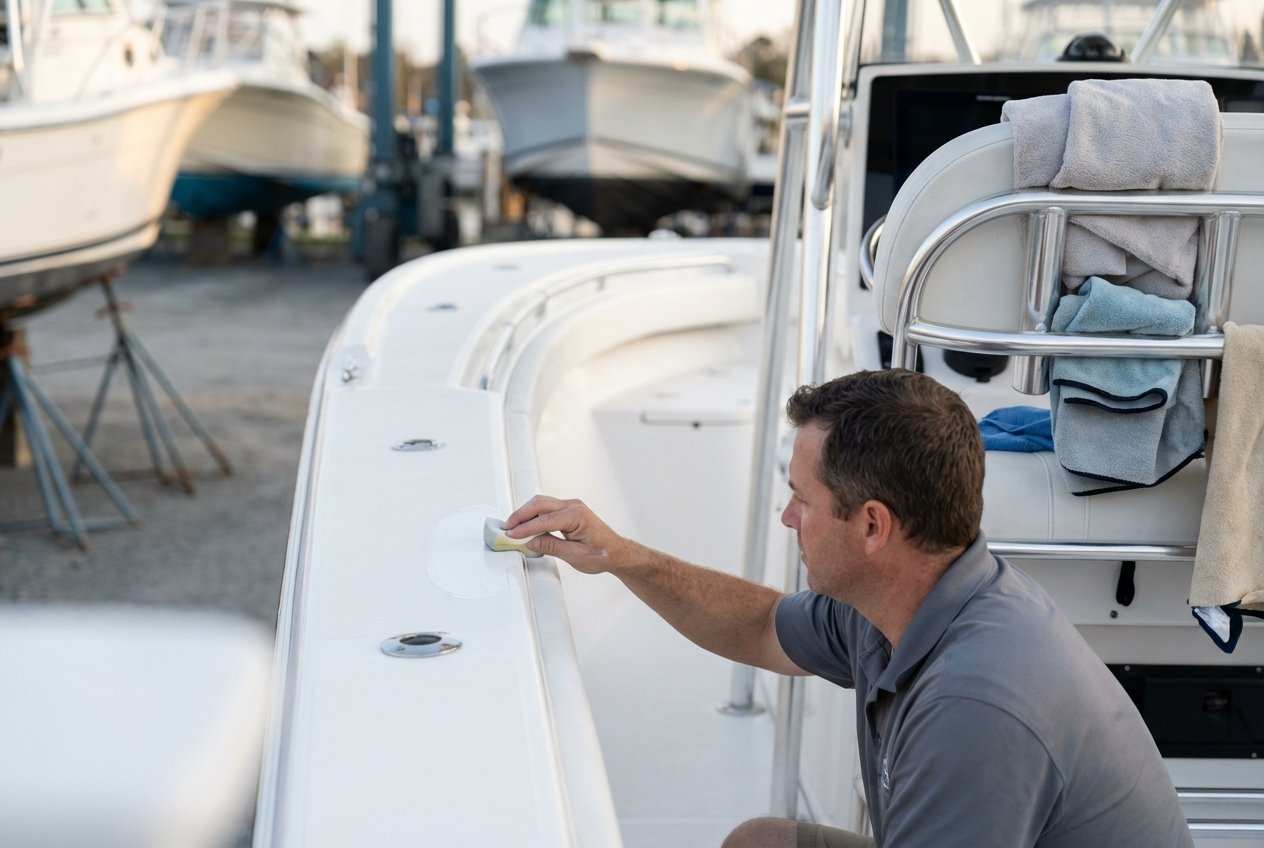
How Do You Handle the Fiberglass Hull on a RIB?
Most RIBs have a fiberglass V-hull below the tubes. This section gets standard hard-hull treatment, but with one caveat: be careful at the tube-to-hull junction. Runoff from aggressive hull cleaners will contact the tube fabric.
Wash the hull with Boat Wash Pro, which is formulated for gelcoat and won't damage tube material on contact. Start at the waterline and work down, so dirty rinse water flows away from the tubes above.
If the hull needs compounding or oxidation removal, mask the tube fabric at the junction with painter's tape and plastic sheeting. Compound splatter on Hypalon is annoying to remove. Compound splatter on PVC can cause permanent marking.
For boats with antifouling paint on the hull bottom, inspect for blistering and adhesion loss after winter. Touch up bare spots before launch. This isn't a detailing step, but I've pulled enough boats where the bottom paint is flaking into the water to mention it.
How Should You Care for Console and Seating?
RIB consoles take a beating. They sit in direct sun, catch salt spray on every run, and passengers grab them with sunscreen-covered hands. Sunscreen is one of the most destructive substances for marine vinyl, and nobody thinks about it until the seat cushions are cracked and discolored.
Clean all vinyl surfaces, including seat cushions, console padding, and bolster covers, with Vinyl Bright. Work it into the grain with a soft brush, then wipe clean with a damp microfiber cloth. For detailed vinyl care techniques, check our guide on boat vinyl and upholstery cleaning. If you're dealing with winter mildew on seats, our spring vinyl mildew cleaning guide covers the full removal and prevention process.
Inspect stitching on all upholstered surfaces. Winter moisture promotes thread rot, especially on boats stored outdoors. A re-stitch now costs a fraction of a full re-upholster later.
Check instrument panels for moisture intrusion. Condensation behind gauges during winter storage causes corrosion on electrical contacts. Spray connections with a moisture-displacing electrical protectant.
Lubricate all hinges, latches, and seat mounts with a marine-grade corrosion inhibitor. Storage compartment hinges seize up over winter more than any other hardware on the boat.
What's the Right Way to Inflate Before Launch?
Getting inflation right matters more than most people realize. Under-inflated tubes flex too much, stressing seams and reducing performance. Over-inflated tubes risk blowing a seam on a hot afternoon when air pressure builds with temperature.
Pressure Guidelines
Your owner's manual is the final authority. That said, most recreational RIBs run between 3.0 and 3.6 PSI (0.21 to 0.25 bar) in the main chambers. Keel sections, where fitted, often call for slightly higher pressure, around 4.0 to 5.0 PSI (0.28 to 0.34 bar).
Critical rule: inflate in the morning or in shade. If you pump up the tubes in direct afternoon sun, the air inside is already warm and expanded. As the day heats up further, pressure will climb beyond spec. I've seen a tube seam let go on a 95-degree afternoon because the owner inflated at noon in full sun. That's not a manufacturing defect. That's physics.
Inflation Sequence
- Inflate all main chambers to roughly 80% of target pressure.
- Inflate the keel (if equipped) to its target pressure.
- Top off main chambers to full pressure.
- Check with a gauge. Your hand is not a gauge. Your hand has no idea what 3.2 PSI feels like, and neither does mine after fifteen years.
- Record the pressure, ambient temperature, and time. This gives you a baseline for monitoring throughout the season.
Temperature Compensation
Air pressure in enclosed chambers changes approximately 1 PSI for every 10°F shift in temperature, a rule of thumb widely confirmed by tire industry data and basic gas law physics. On a boat that goes from a 70°F morning to a 100°F afternoon on the water, tubes inflated to 3.5 PSI could reach 3.8 PSI or higher. That's within margin for most boats, but it adds up if you started high.
Inflate to the lower end of the manufacturer's range in warm climates. In cooler northern waters, you have more headroom.
Putting It All Together
My spring RIB prep takes about four to five hours for a 7-meter boat, working alone. A smaller tender might need two hours. Here's the sequence I follow:
- Full inspection (30-45 minutes)
- Tube cleaning with Liquid RIB (60-90 minutes)
- Rinse and dry (30 minutes)
- UV protection with LR Sealer UV (30-45 minutes, including cure time)
- Hull wash with Boat Wash Pro (30-45 minutes)
- Console and seating with Vinyl Bright (20-30 minutes)
- Final inflation check and pressure log (15 minutes)
This isn't weekend-killing labor. It's a solid morning's work that saves thousands in tube replacement and keeps your RIB performing the way it was designed to. Salt water finds every shortcut you took. Spring prep is where you stop cutting corners.
Frequently Asked Questions
How often should I apply UV protectant to my inflatable tubes?
For boats in regular use, apply UV protectant every four to six weeks during the season. Boats stored outdoors or in southern climates with intense sun exposure may need treatment every three to four weeks. Always reapply after any deep cleaning session, since the cleaning process removes some of the existing protective layer.
Can I use regular boat wash soap on inflatable tubes?
No. Most marine boat wash formulas contain solvents or alkaline compounds designed for gelcoat and fiberglass. These strip plasticizers from PVC and damage the surface of Hypalon, accelerating aging. Use a cleaner formulated for inflatable boat fabric, like Liquid RIB, which is pH-balanced for both Hypalon and PVC.
What PSI should my RIB tubes be inflated to?
Most RIB manufacturers specify between 3.0 and 3.6 PSI (0.21 to 0.25 bar) for standard tubes. Always check your owner's manual for the exact figure. Keel sections often run slightly higher. Never guess. Use a low-pressure gauge rated for inflatables, and inflate in the morning or shade to avoid temperature-related over-pressurization.
How do I tell if my tubes are Hypalon or PVC?
Check the manufacturer's spec sheet or the compliance plate on your transom. As a field test, dab acetone on a white rag and press it against the tube in a hidden area. The rag will pick up color from PVC but not from Hypalon. Hypalon also has a slightly matte, rubbery texture compared to PVC's smoother, glossier finish.
How long do inflatable boat tubes last?
Hypalon tubes last 15 to 20 years with proper maintenance, including regular cleaning and UV protectant application. PVC tubes last 7 to 10 years with care. Neglected tubes of either material can fail in half that time due to UV degradation, plasticizer loss, and seam adhesive breakdown. Consistent UV protectant application is the single biggest factor in extending tube life.
Can mice damage inflatable boat tubes?
Yes, and it's more common than most owners realize. Mice and other rodents chew through inflatable tube fabric, valve housings, and adhesive seams during winter storage. They also nest inside deflated tubes and compartments, leaving acidic urine that degrades fabric over time. Inspect tubes carefully after winter storage, especially around valves and seams at the transom, and use rodent deterrents during layup.
How should I store my RIB for winter?
Clean tubes thoroughly and apply UV protectant before storage. Deflate tubes to about 50 percent pressure to reduce seam stress while maintaining shape. Store indoors if possible, or under a ventilated cover. Place rodent deterrents around the boat. Remove electronics and valuables. If accessible, check monthly during storage to catch early issues.
About the Expert
Alex Martinez
Charter Captain & Marine Detailer
After 15 years running charter boats, Alex transitioned into professional marine detailing. He brings hands-on experience with every kind of boat problem salt water can throw at you.
“Salt water finds every shortcut you took.”
Get Expert Tips
Subscribe for marine care insights and product updates from industry professionals.
No spam. Unsubscribe anytime.
You May Also Like
Spring Gelcoat Restoration: How to Remove Winter Oxidation
A marine technician's field guide to assessing and restoring gelcoat oxidation after winter storage, from light haze to heavy chalking, with product recommendations and prevention strategies.
Spring Boat Prep Checklist: The Complete Detailing Guide for Launch Season 2026
Step-by-step spring boat prep: hull cleaning, oxidation removal, sealant application, vinyl care, and final inspection. Get your boat launch-ready for 2026.
How to Clean Your Boat After Winter Storage
A marina manager's step-by-step guide to cleaning your boat after winter storage, covering exterior wash, interior mildew removal, and the mistakes that cause real damage every spring.