Professional boat detailing is a multi-phase restoration process that systematically cleans, corrects, and protects every exterior and interior surface of a vessel. Unlike basic washing, detailing includes decontamination, gelcoat correction (machine polishing to remove oxidation and defects), metal polishing, protective sealant or ceramic coating application, interior reconditioning, and final inspection. According to BoatUS, professional boat detailing for vessels 25 feet and longer typically costs between $8 and $40 per foot depending on condition and services included. The National Marine Manufacturers Association (NMMA) recommends professional detailing at least once per season to maintain gelcoat integrity, UV protection, and resale value.
What does a professional spring boat detail include? It includes a systematic restoration of every exterior and interior surface after winter storage: decontamination washing, gelcoat correction, below-waterline cleaning, metal polishing, protective sealant application, interior reconditioning, glass treatment, and a final walk-around inspection. This is the full scope of work I perform on every client boat each spring.
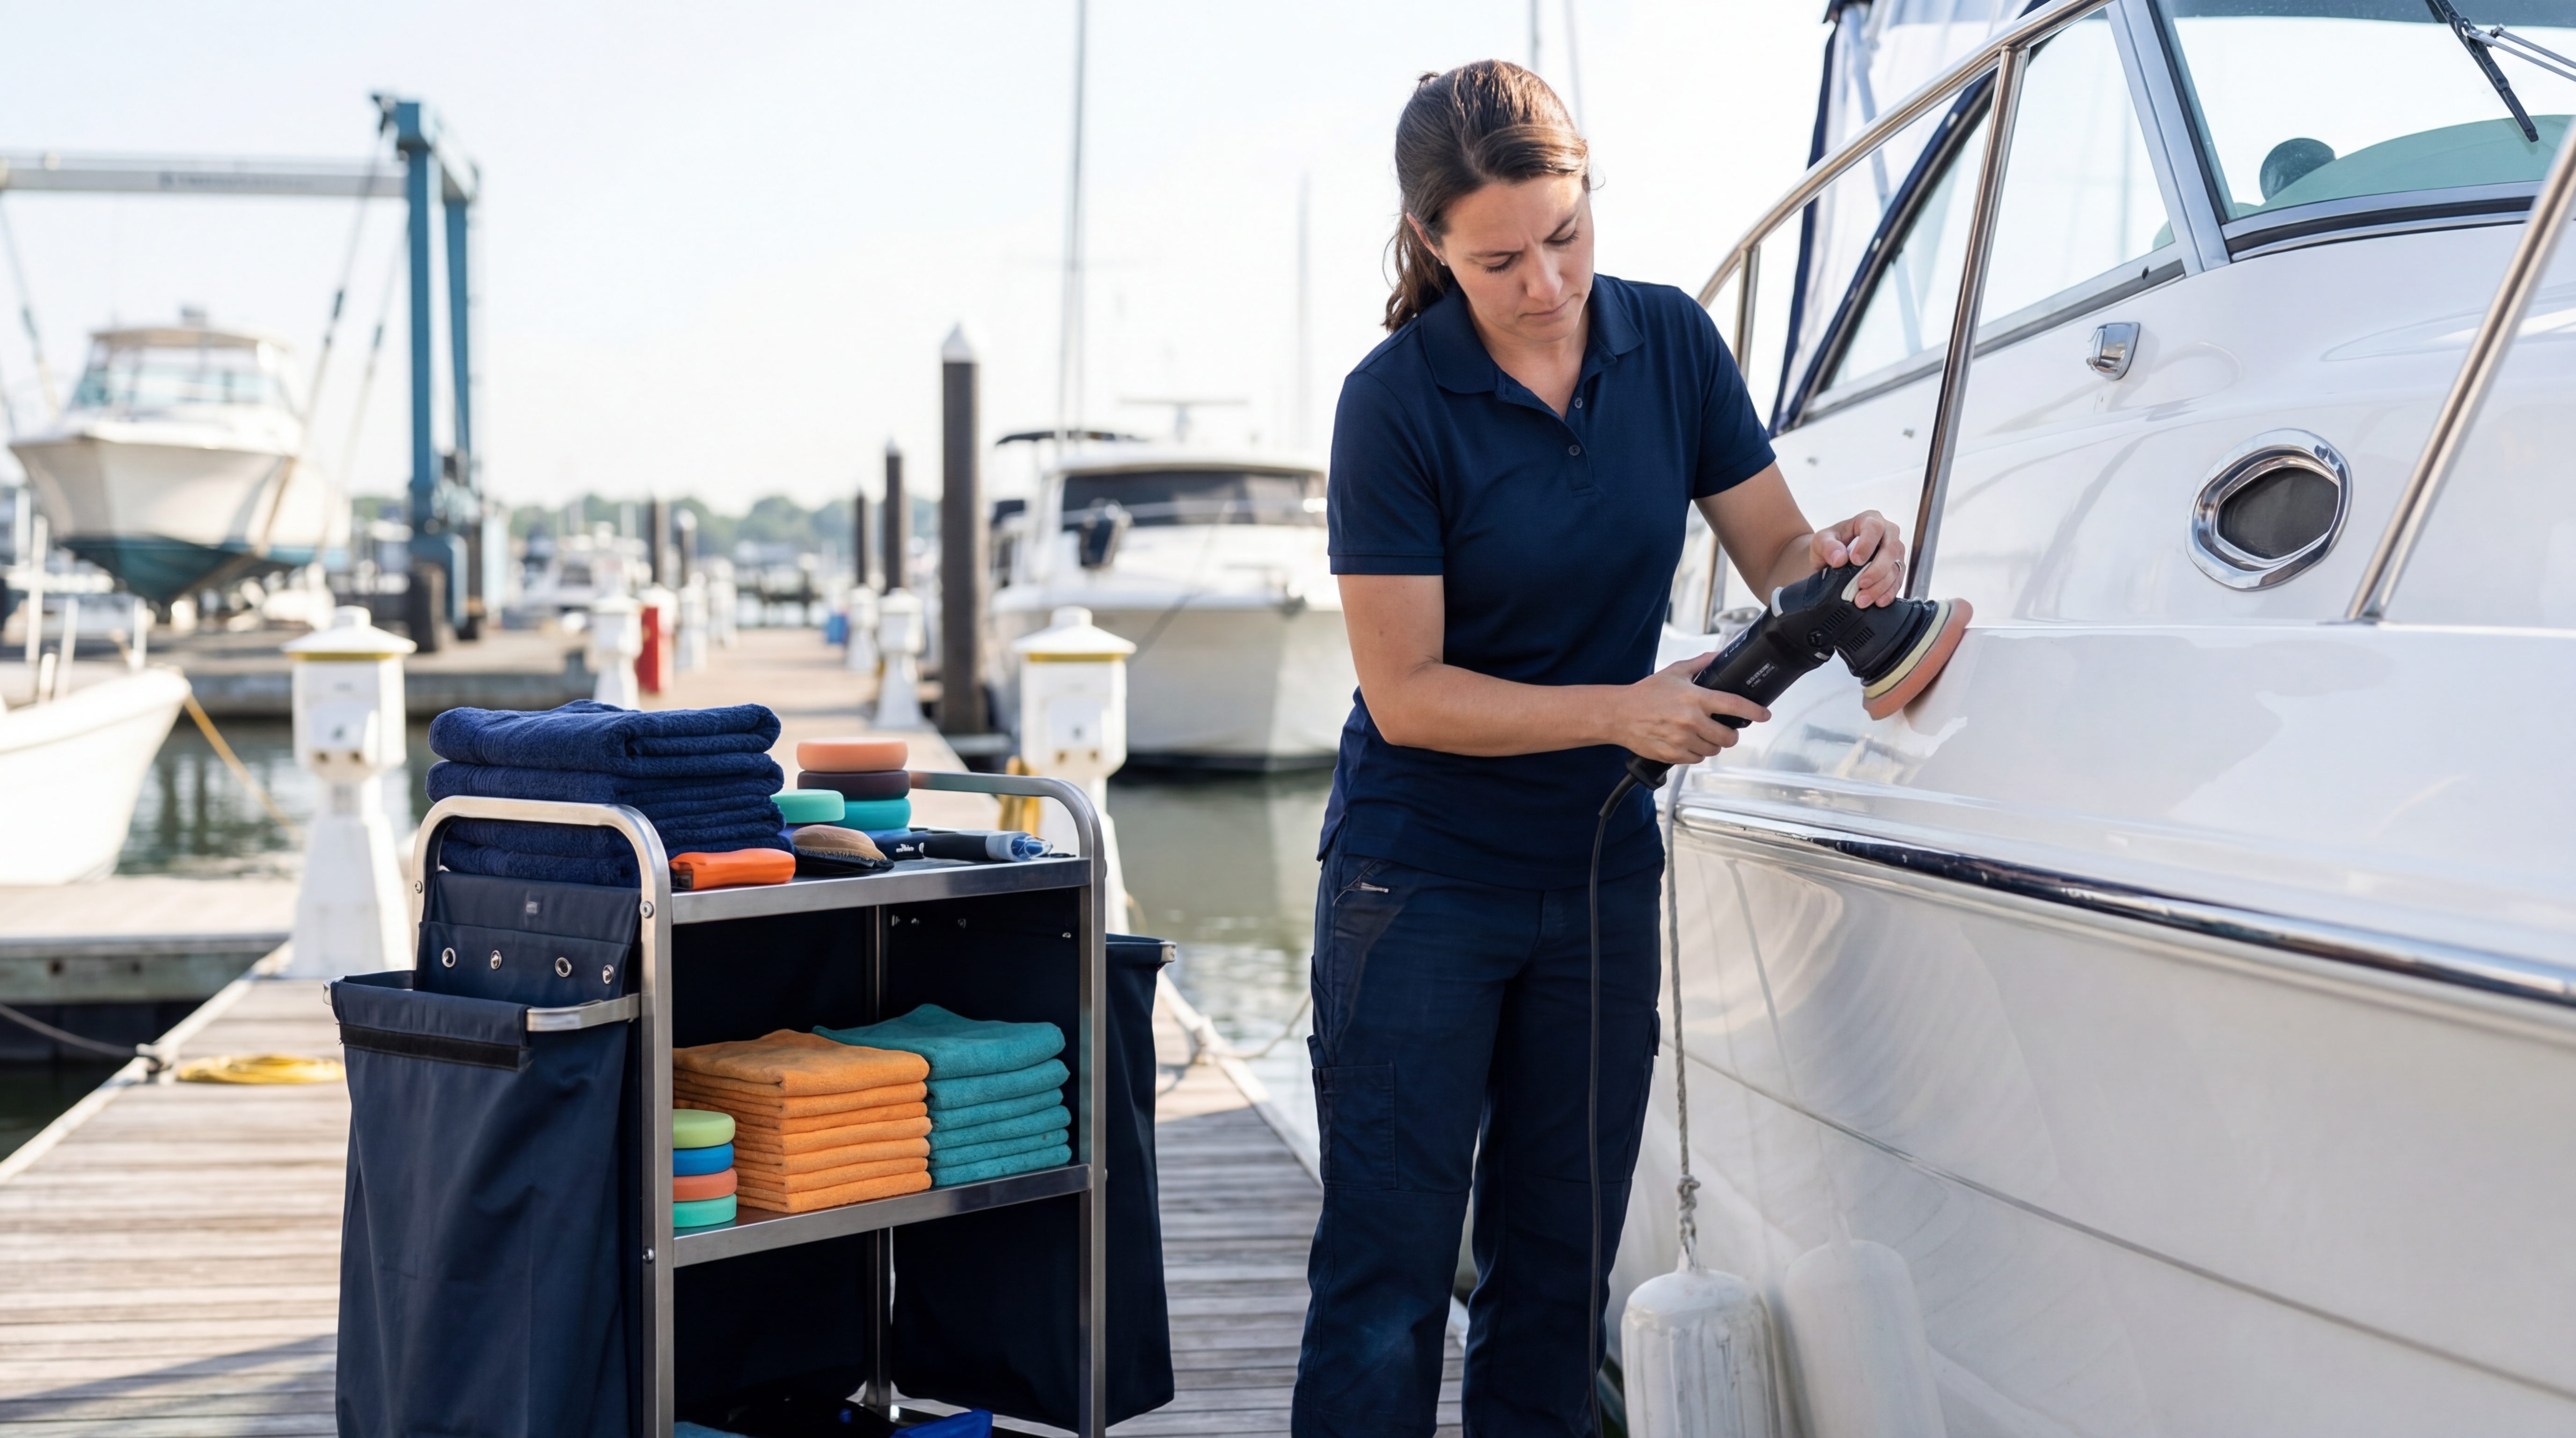
My name is Sarah Rodriguez. I've run a marine detailing operation in Chesapeake Bay for eleven years. I've detailed everything from 18-foot center consoles to 55-foot sportfishers, and the system I'm about to share is the one I use on every single boat. Not a simplified version for an article. The actual workflow my team follows, step by step.
Your boat is my billboard. When it leaves my shop, it represents my business at every dock, every fuel stop, every raft-up. That's why I don't do "good enough." And that's why I developed a repeatable system instead of winging it every spring.
Why Does Professional Detailing Differ from DIY?
Three things separate a professional spring detail from a weekend DIY effort: equipment, product knowledge, and time investment.
I carry a Rupes LHR21 and LHR75 dual-action polisher set, a rotary for heavy cuts, a Tornador cleaning gun, a steam unit, and about forty different microfiber towels and pads graded by cut level and fiber density. My product trailer holds dedicated compounds, polishes, sealants, and cleaners for gelcoat, painted surfaces, aluminum, stainless, chrome, vinyl, carpet, glass, and teak. That inventory represents thousands of dollars and years of testing what works on marine surfaces versus what just works in a marketing video.
The time factor matters too. A thorough spring detail on a 30-foot boat takes me 10 to 14 hours. Most boat owners budget a Saturday afternoon. That gap between available time and required time is where corners get cut, and cut corners show up fast on the water.
I'm not saying DIY detailing is wrong. I'm saying professional detailing is a different service with different results, and understanding that difference helps you decide what your boat needs.
How Does a Professional Assessment Work?
Before I touch a bottle or plug in a polisher, I walk the entire boat with my phone camera and a checklist. This assessment determines scope, sets client expectations, and protects both of us.
I'm looking for:
- Gelcoat condition: oxidation level (light haze, moderate chalking, heavy yellowing), scratches, gouges, stress cracks
- Waterline staining: mineral deposits, algae lines, anti-fouling paint bleed
- Metal condition: pitting on stainless, corrosion on aluminum, tarnish on chrome
- Interior wear: vinyl cracking, mildew presence, carpet staining, headliner sag
- Previous work quality: old wax buildup, uneven compound marks, masking tape residue
I photograph everything and send the client a condition report with a scope estimate before starting. This takes 20 to 30 minutes and saves hours of back-and-forth later. It also creates a "before" record that shows the client exactly what their investment accomplished.
What Are the 8 Phases of a Professional Spring Detail?
Here's the system. Each phase builds on the one before it, and skipping phases creates problems downstream.
Phase 1: How Should You Approach the Decontamination Wash?
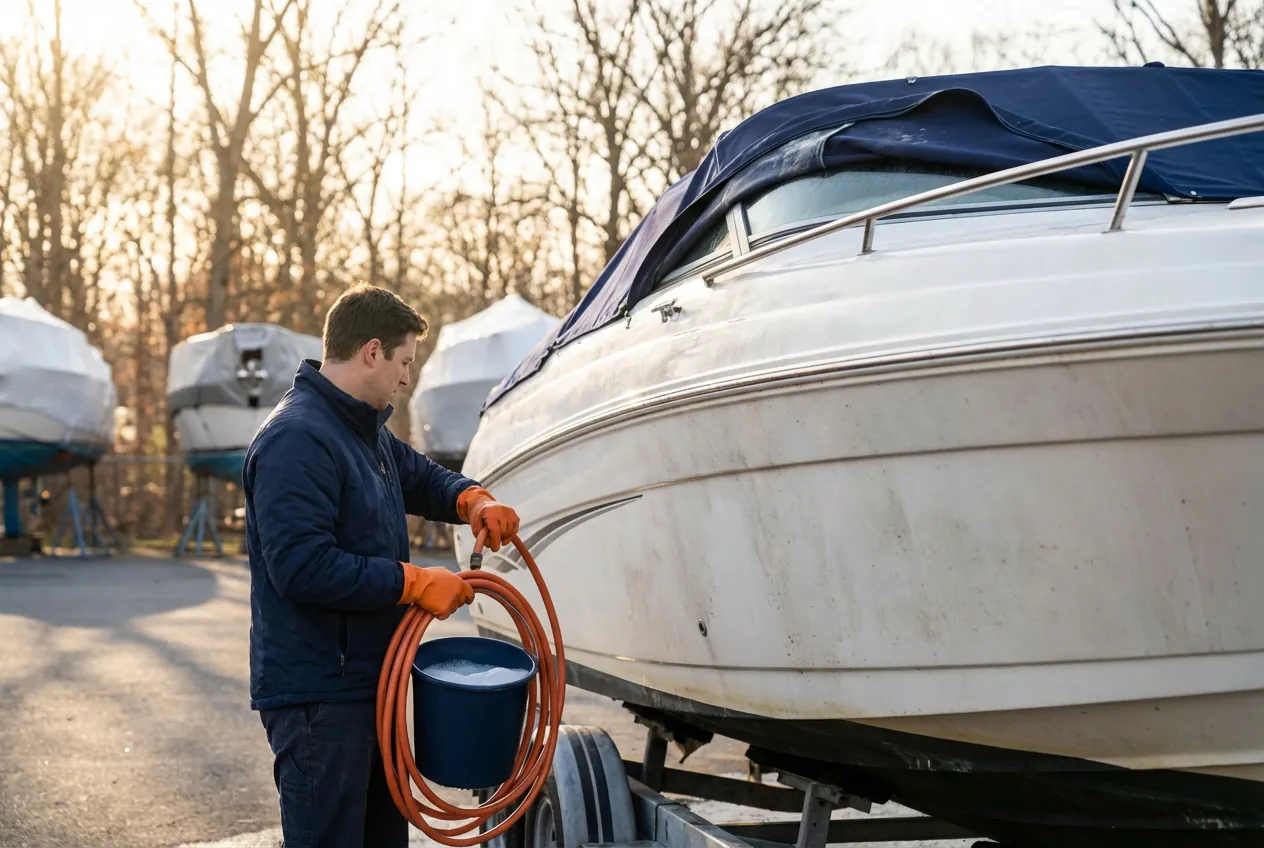
Everything starts with removing six months of storage grime, bird droppings, pollen, tree sap, and whatever the cover let through. I work top to bottom, bow to stern, using Boat Wash Pro diluted at the heavy-duty ratio for the first pass.
I pre-soak each section for two to three minutes before agitating with a medium-pile wash mitt. Gelcoat is softer than automotive clear coat, and dried contaminants can scratch it during washing if you don't give the soap time to loosen them first. I use a two-bucket method with grit guards, same as any serious detailer.
For stubborn organic stains like bird droppings that have baked on, I'll spot-treat with a dedicated alkaline cleaner before the main wash. Tree sap gets a citrus-based solvent applied with a microfiber applicator.
The rinse uses filtered water when available. Hard water minerals left to dry on dark gelcoat create spots that look like defects after correction. This is a detail most DIY guides skip.
Phase 2: What Does Above-Waterline Correction Involve?
This is where training and equipment matter most. Gelcoat correction means removing a thin layer of damaged or oxidized material to reveal fresh, glossy gelcoat underneath. Done right, it transforms a chalky hull. Done wrong, it burns through the gelcoat and creates a repair bill.
Professional gelcoat correction requires assessing the depth of oxidation before selecting a compound and pad combination. Light oxidation responds to a finishing polish on a soft foam pad. Moderate chalking needs a medium-cut compound on a firm foam or microfiber cutting pad, followed by a finishing polish. Heavy oxidation on neglected boats may require a heavy-cut compound on a wool pad to break through the damaged layer before stepping down through finer stages. Each combination removes material at a different rate, and reading the gelcoat's response during the first test section prevents removing more material than necessary. The International Detailing Association, which offers marine-specific watercraft certification, teaches that multi-stage correction preserves more gelcoat than single-stage aggressive cutting.
I use a dual-action polisher for 90% of correction work. The random-orbit pattern distributes heat evenly and reduces the risk of burning through. I only switch to a rotary on heavily oxidized commercial vessels where the gelcoat is thick enough to tolerate it.
My go-to sequence for moderate oxidation: medium-cut compound on an orange foam pad, followed by a finishing polish on a black foam pad. I work in 2-by-2-foot sections, keeping the pad flat against the surface and moving at about one inch per second. Speed setting stays at 4 to 5 on the Rupes.
After correction, I wipe each section with an IPA (isopropyl alcohol) solution to strip polishing oils. This reveals the true condition of the gelcoat without any filler masking remaining defects. If I see haze or swirl marks under the IPA wipe, that section gets another pass.
For a full guide on tackling oxidation, see our best boat wax and oxidation guide. For the specific challenges of winter-induced oxidation, our spring gelcoat restoration guide covers assessment and correction by severity level.
Phase 3: How Do You Clean Below the Waterline?
Below-waterline work is grunt work. Waterline stains from mineral deposits, algae, and anti-fouling paint bleed don't respond to normal cleaners. I use an acidic hull cleaner formulated for marine use, applied with a stiff-bristle brush in small sections.
The key is dwell time without drying. I keep the surface wet, let the acid work for the recommended time (usually 3 to 5 minutes), and agitate before rinsing. On boats with anti-fouling paint, I clean right up to the paint edge but not onto it, because acidic cleaners can degrade the paint matrix.
For running gear (props, shafts, trim tabs), I use a metal-specific cleaner matched to the alloy. Bronze props get a different product than stainless or aluminum. Getting this wrong causes discoloration or accelerated corrosion.
Phase 4: What's the Right Way to Handle Metal and Hardware?
Boats have a lot of metal: stainless steel rails, aluminum T-tops, chrome cleats, bronze through-hulls. Each alloy has different cleaning and polishing requirements.
Stainless steel gets a dedicated stainless polish applied by hand with a microfiber applicator. I work one fitting at a time, polish to a mirror finish, and wipe clean before moving to the next. For pitted stainless (common on older boats), I'll use a more aggressive stainless compound first.
Aluminum gets an aluminum-specific polish. Never use stainless compounds on aluminum. The abrasive profile is wrong, and you'll leave a hazy finish that's hard to correct.
Chrome is the easiest. A light polish brings it back in one pass unless there's heavy pitting, at which point you're looking at replating, not polishing.
I tape off gelcoat and painted surfaces adjacent to metal hardware before polishing. Metal polish on gelcoat creates staining that requires compound correction to remove. Five minutes of taping saves an hour of rework.
Phase 5: How Should Protection Be Applied?
Protection is the payoff. Everything up to this point was preparation. Now we're sealing that corrected, clean gelcoat against UV, salt, pollution, and biological growth for the season ahead.
A professional-grade marine sealant outperforms traditional carnauba wax in durability, UV resistance, and hydrophobic performance. Products like GRP Sealer UV bond chemically to the gelcoat surface rather than sitting on top of it, creating a protective barrier that lasts three to six months in saltwater environments versus four to eight weeks for paste wax. The chemical bond resists wash-off from docking spray, rain, and regular cleaning, which means the boat maintains its gloss and beading behavior between maintenance washes. For boats stored outdoors or used in high-UV regions, a sealant with dedicated UV inhibitors prevents the oxidation cycle from restarting during peak summer exposure. Applying sealant to properly corrected and IPA-wiped gelcoat ensures maximum bond strength and longevity. According to BoatUS, chemical-bond sealants outperform traditional wax in saltwater environments because they resist mechanical wash-off and UV degradation.
My protection sequence: GRP Sealer UV as the base layer, applied with a foam applicator pad in straight overlapping passes. I let it cure for the manufacturer's recommended time, then buff off with a clean, short-nap microfiber towel. On boats where the client wants maximum gloss and extra protection, I follow with Smooth Opacity UV as a topper.
For non-skid surfaces, I use Smooth Opacity UV which provides UV protection without making the surface slippery. This is a common oversight: applying glossy sealant to non-skid creates a safety hazard.
Phase 6: What Does Professional Interior Detailing Cover?
Marine interiors take punishment from sun, salt air, wet swimsuits, sunscreen, fish blood, and spilled drinks. Spring interior work addresses the accumulated damage and prevents further deterioration.
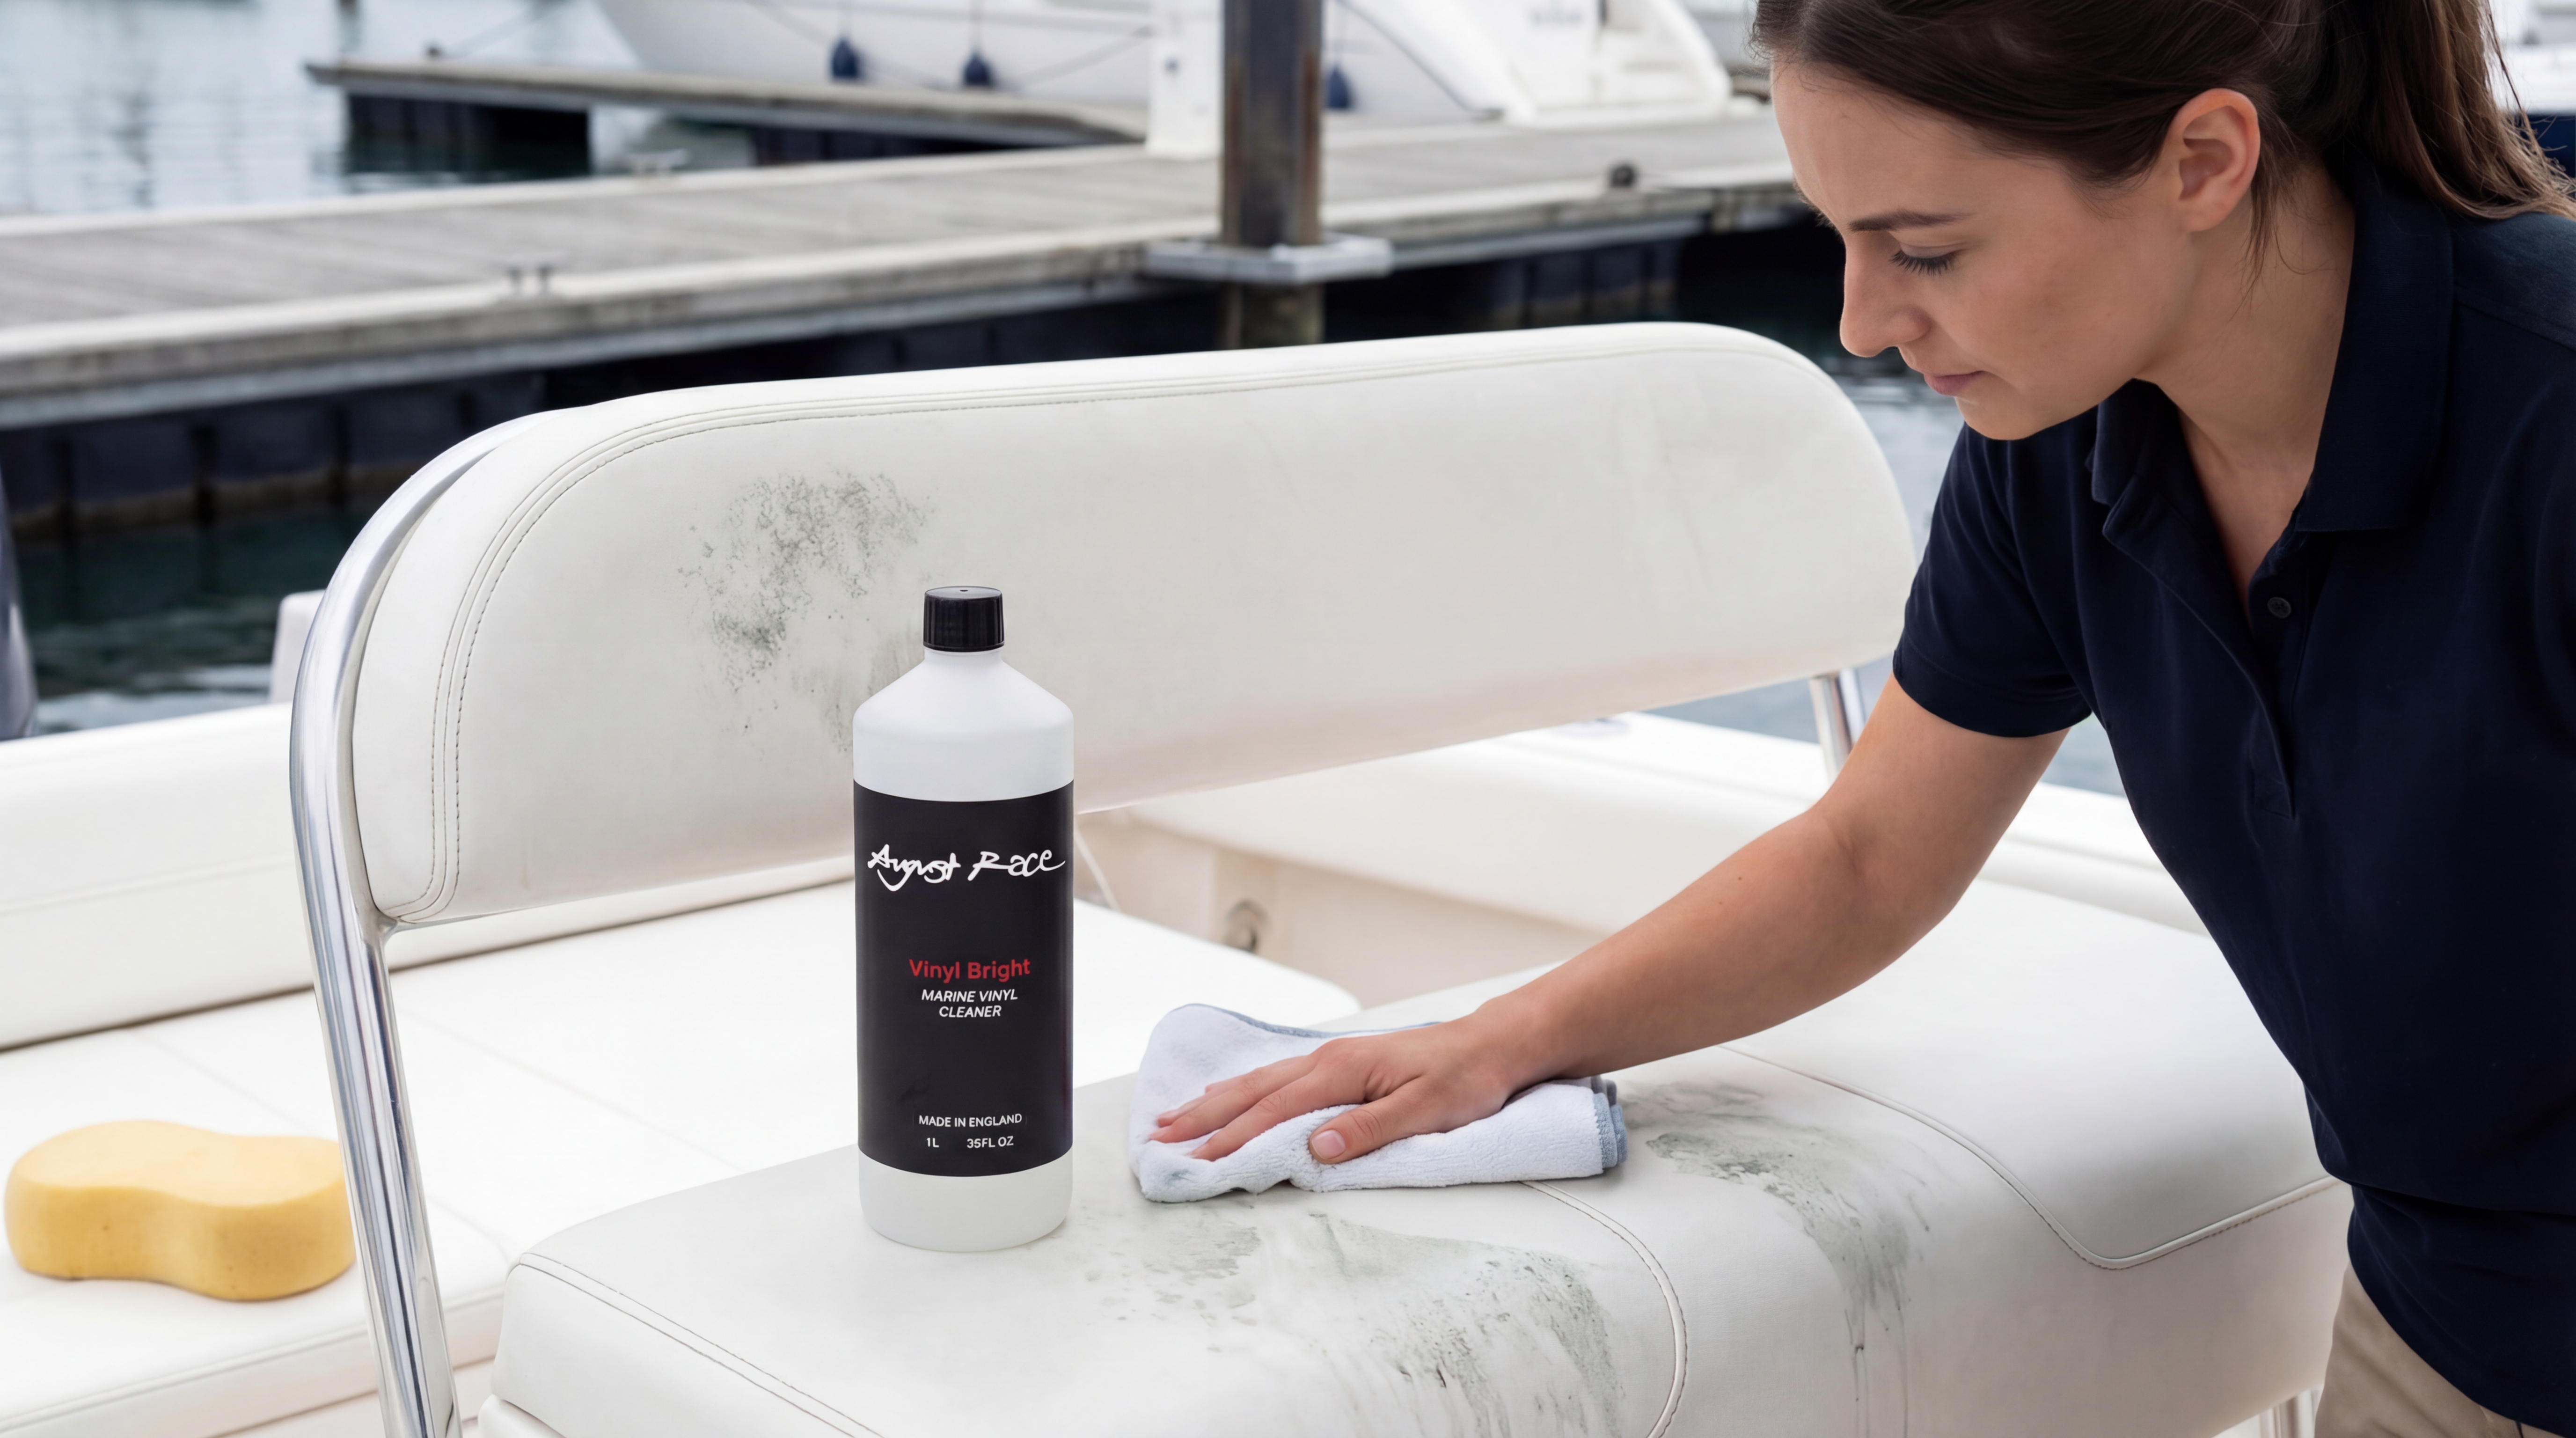
Vinyl gets the most attention. I clean all vinyl surfaces with Vinyl Bright, which removes ground-in stains and sunscreen residue without drying out the material. After cleaning, I apply a UV-protective vinyl conditioner that keeps the material supple through the season. Cracked vinyl absorbs water and grows mildew from the inside out, so conditioning is maintenance, not cosmetics.
Carpet gets extracted with a hot-water extractor if it's removable, or deep-cleaned in place with a marine-rated carpet shampoo and brush. I treat mildew spots with a peroxide-based cleaner before shampooing.
Headliners are delicate. Most marine headliners use a foam-backed fabric that separates if you saturate it. I clean headliners with a low-moisture foam cleaner and a soft brush, working in small sections and blotting dry immediately.
Phase 7: How Should Glass and Electronics Be Cleaned?
Marine glass collects salt haze, water spots, and oxidation (on older acrylic windshields). I clean glass with a dedicated marine glass cleaner and a waffle-weave microfiber towel. For water spots that don't respond to glass cleaner, I use a mild acidic solution designed for mineral deposit removal.
Electronics screens (chartplotters, fishfinders, multifunction displays) need special care. Never use glass cleaner on an electronics screen. The ammonia can damage anti-glare coatings. I use a screen-specific cleaner applied to the cloth, not the screen, and wipe gently without pressure.
Isinglass (clear vinyl enclosures) gets its own treatment. I clean with a dedicated isinglass cleaner and apply an anti-static protectant that repels dust and reduces hazing. Isinglass scratches if you look at it wrong, so I use only the softest microfiber or a designated isinglass cloth.
Phase 8: What Does the Final Inspection Include?
The last phase takes 30 to 45 minutes and catches everything I missed or that needs touch-up. I walk the boat from every angle, at eye level and from the dock looking up, in direct sunlight if possible.
I'm checking for: compound residue in seams, polish dust in scuppers, missed spots on rails, streaks on glass, haze from sealant that didn't get buffed fully, and any area where my tape lines weren't clean.
I re-photograph the entire boat using the same angles as the assessment photos. These "after" images go to the client alongside the originals and form part of my portfolio for future clients. Every boat that leaves my care looking right brings in the next job.
How Long Does a Professional Spring Detail Take?
Time depends on boat size, condition, and scope. Here are my estimates for a full 8-phase spring detail on boats in average condition (stored under cover, not heavily oxidized):
| Boat Size | Estimated Hours | Typical Phases | Notes |
|---|---|---|---|
| 18–22 ft | 6–9 hours | All 8 | Single-day job for one detailer |
| 23–30 ft | 8–14 hours | All 8 | May require two days or a two-person crew |
| 31–40 ft | 14–22 hours | All 8 | Two-person crew, two to three days |
| 40+ ft | 22–40+ hours | All 8 | Full crew, three to five days; often phased over a week |
These estimates assume average condition. A neglected boat with heavy oxidation, mildew-covered interiors, and corroded hardware can double these numbers. That's why the assessment phase matters: it sets realistic timelines before work begins.
What Do Professional Detailing Service Tiers Include?
Not every boat needs a full 8-phase detail. Most professional shops offer tiered service packages. Here's a breakdown of typical pricing and scope for a 25-foot boat:
| Service Tier | Price Range (25 ft) | Per-Foot Rate | Time | What's Included |
|---|---|---|---|---|
| Basic Wash & Wax | $250-$450 | $10-$18/ft | 3-5 hours | Decontamination wash, hand wax application, interior wipe-down, glass cleaning |
| Full Spring Detail | $500-$900 | $20-$36/ft | 8-14 hours | All 8 phases: wash, correction, below-waterline, metal polish, sealant, interior, glass, inspection |
| Correction & Ceramic | $1,500-$4,000 | $60-$160/ft | 16-30 hours | Multi-stage machine correction, ceramic coating application, full interior, all metal and glass — includes 1-2 year coating warranty |
Professional marine detailing pricing varies significantly by region, boat condition, and service scope. Industry data indicates that basic wash-and-wax services start at $10-$18 per foot, while full correction and ceramic coating packages can reach $60-$160 per foot for premium work on larger vessels. According to Practical Sailor, the quality of surface preparation — particularly the compound and polish selection matched to the oxidation level — determines both the immediate result and the longevity of any protective coating applied afterward. Boat owners should request itemized estimates that specify which phases are included, as pricing "per foot" without scope detail makes comparison between shops unreliable.
What Should You Look for When Hiring a Detailer?
Not all detailing operations deliver the same quality. Here's what I'd want to know if I were hiring someone to detail my boat.
Questions to ask:
- What products do you use, and why? A professional should be able to explain their product choices, not just name brands.
- Do you carry marine-specific insurance? General liability at minimum. Boats are expensive, and accidents happen.
- Can I see before-and-after photos of similar boats? Portfolio quality tells you more than promises.
- What's your process for gelcoat correction? Anyone who says "I just use a buffer" hasn't been trained properly.
- Do you do a pre-work assessment and condition report?
Red flags:
- No written estimate or scope documentation
- Claims of "one-day full details" on boats over 25 feet (they're cutting phases)
- No insurance or unwillingness to discuss it
- Using automotive products exclusively (marine surfaces have different requirements)
- Pricing far below market rate ($15 to $50 per foot is the standard range; anything under $12/ft is suspect)
Pricing guidance: For a full spring detail, expect to pay $15 to $50 per foot depending on your region, boat condition, and included services. A 25-foot boat in fair condition typically runs $500 to $900. Premium services like ceramic coating application or heavy oxidation removal are quoted separately.
Should You DIY or Hire a Professional?
Here's an honest comparison. I make my living doing this work, so I have a financial interest in you hiring a pro. But I also believe in boat owners knowing what they're getting into either way.
The decision between DIY and professional boat detailing depends on three factors: the owner's available time, the condition of the boat's surfaces, and the cost of correcting mistakes. A boat in good condition that received professional detailing last season and was stored properly may need only a wash, light polish, and sealant application, which a competent owner can handle in a weekend with the right products. A boat with moderate to heavy oxidation, waterline staining, or mildew-damaged interiors requires correction equipment, multi-stage product systems, and experience reading surface response during polishing. Attempting gelcoat correction without training risks burning through the surface, creating swirl marks visible in direct sunlight, or applying sealant over uncorrected defects that lock in the damage. The American Boat and Yacht Council sets industry standards for boat construction and maintenance. Powered correction tools on gelcoat surfaces carry real risk of burn-through, which is why professional service is recommended for owners without compounding experience.
| Factor | DIY | Professional |
|---|---|---|
| Time investment | 2–4 weekends for a thorough job | Drop off and pick up |
| Equipment cost | $500–$1,500 for quality tools and products | Included in service price |
| Correction quality | Limited by experience and equipment | Consistent, trained results |
| Risk of damage | Moderate (burn-throughs, swirl marks) | Low (insured, experienced) |
| Product knowledge | Trial and error over seasons | Tested systems matched to surfaces |
| Cost per season | $200–$600 in consumables | $500–$2,000+ depending on size |
| Satisfaction | High for hands-on owners | High for results-focused owners |
The hybrid approach works well for many owners: handle the wash, interior, and basic maintenance yourself using quality products like Boat Wash Pro and Vinyl Bright, and bring in a professional for annual correction and sealant application.
Frequently Asked Questions
How much does professional spring boat detailing cost?
Most professionals charge $15 to $50 per foot depending on boat condition, services included, and regional rates. A 25-foot boat in fair condition runs $500 to $900 for a full spring detail. Heavy oxidation removal or ceramic coating adds to the base price. Always get a written estimate after an in-person assessment.
How long does a professional spring detail take?
A full spring detail on a 23-to-30-foot boat takes 8 to 14 hours depending on condition. Boats with heavy oxidation or neglected interiors push that to 16 or more hours. I schedule two days for most boats in this range to avoid rushing the correction and protection phases.
How often should I have my boat professionally detailed?
At minimum, once per season in spring before launch. Saltwater boats or boats in heavy use benefit from a mid-season maintenance detail (usually a wash, quick polish, and sealant reapplication) and a winterization detail in fall. This three-detail annual cycle keeps surfaces in good condition year over year and reduces the scope of each spring detail.
Can I do some phases myself and hire a professional for the rest?
Yes, and I encourage it. Many of my clients handle the decontamination wash and interior cleaning themselves, then schedule me for gelcoat correction and protection application. This cuts the professional service cost by 30 to 40 percent while preserving the work that demands specialized equipment and training. Just make sure you and your detailer agree on the scope before the appointment so the surface is ready for their work.
What is the difference between boat washing and boat detailing?
Washing removes surface dirt, salt, and grime using soap and water. It's maintenance you should do after every use. Detailing is a comprehensive, multi-phase restoration: decontamination, clay bar treatment, machine correction of the gelcoat, metal polishing, sealant or ceramic application, interior reconditioning, and inspection. Think of washing as brushing your teeth and detailing as a dental cleaning — both necessary, different scope entirely.
Is ceramic coating worth it for a boat?
For boats stored outdoors in high-UV environments, used frequently, or valued above $50,000, ceramic coating delivers strong return on investment. A professional ceramic application costs $1,500-$4,000 but provides 2-5 years of UV protection and hydrophobic performance, eliminating the need for seasonal wax and sealant reapplication. The catch: the gelcoat must be corrected to near-perfect condition before application, because ceramic locks in any remaining swirl marks, oxidation, or staining. That prep work accounts for most of the cost. For boats that are already well-maintained and waxed regularly, the upgrade makes sense when you want to reduce ongoing maintenance effort.
Can you detail a boat while it's in the water?
You can detail topsides, interiors, and all above-waterline surfaces while the boat is in a slip. Below-waterline cleaning, bottom paint work, and running gear polishing require hauling out. When detailing in-water at a marina, use products certified under the EPA's Design for the Environment (DfE) program to comply with Clean Water Act requirements. Many marinas now require DfE-certified products for any in-water cleaning. Our products, including Boat Wash Pro, are formulated with environmental compliance in mind.
About the Expert
Sarah Rodriguez
Marine Detailing Business Owner
Sarah runs a marine detailing business serving luxury yachts and charter fleets. Her reputation rides on every finish, so she only uses products and techniques she'd stake her name on.
“Your boat is my billboard. I don't do 'good enough.'”
Get Expert Tips
Subscribe for marine care insights and product updates from industry professionals.
No spam. Unsubscribe anytime.
You May Also Like

Spring Boat Waxing Guide: Protect Your Hull Before Launch Season
A professional detailer's step-by-step guide to spring boat waxing, covering surface prep, application technique, coat strategy, and when to upgrade to sealant or ceramic protection.
Spring Vinyl and Upholstery Cleaning: How to Remove Winter Mildew from Boat Seats
A professional detailer's step-by-step guide to removing winter mildew from marine vinyl seats, protecting upholstery after cleaning, and preventing mildew from returning next season.
How to Clean Your Boat After Winter Storage
A marina manager's step-by-step guide to cleaning your boat after winter storage, covering exterior wash, interior mildew removal, and the mistakes that cause real damage every spring.